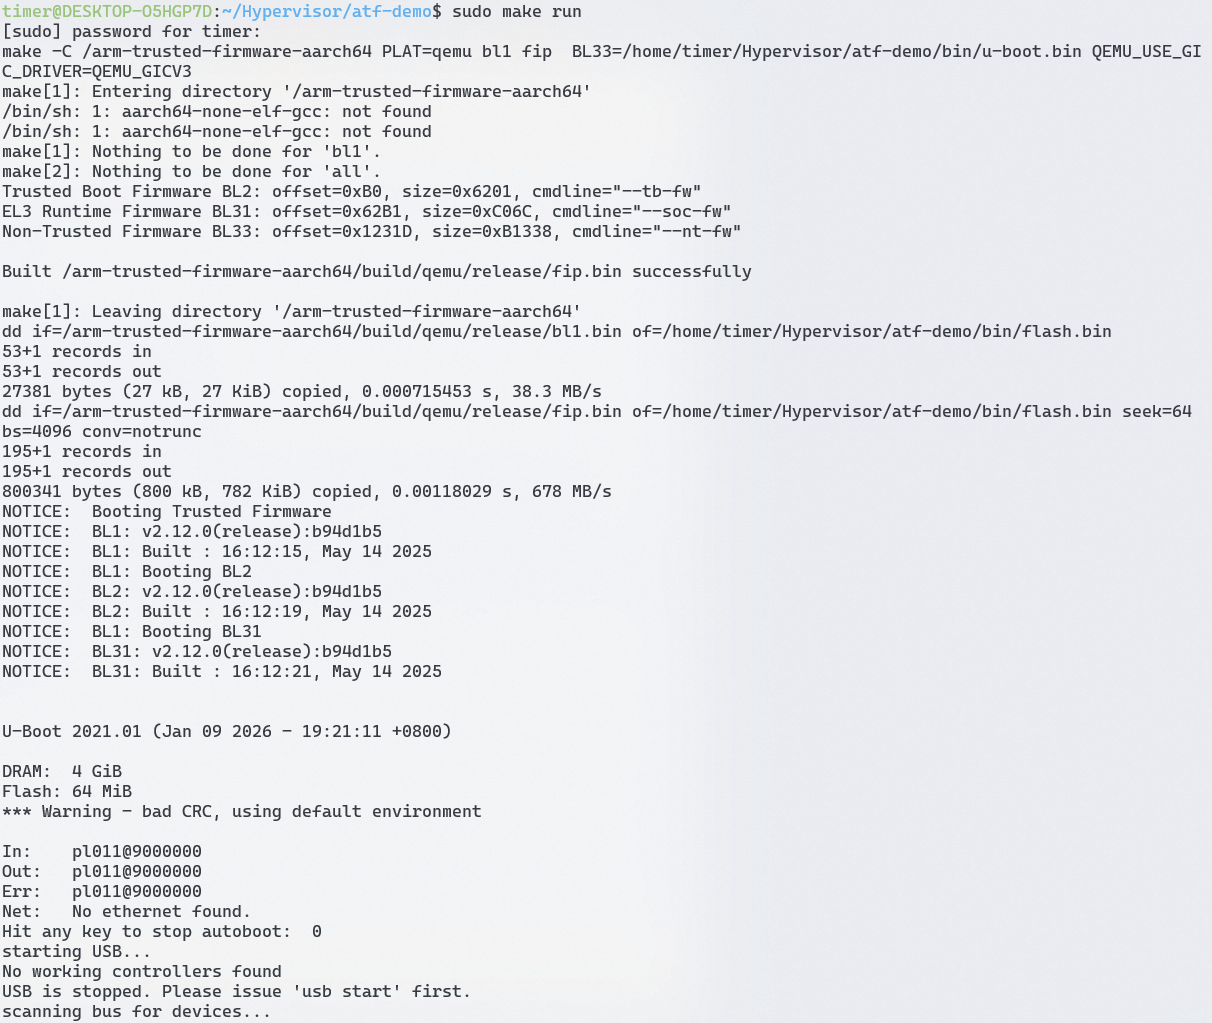
2 启动ATF 2.1 基于qemu运行ATF 项目地址:https://gitee.com/yang_lian/atf-demo
运行结果如下:
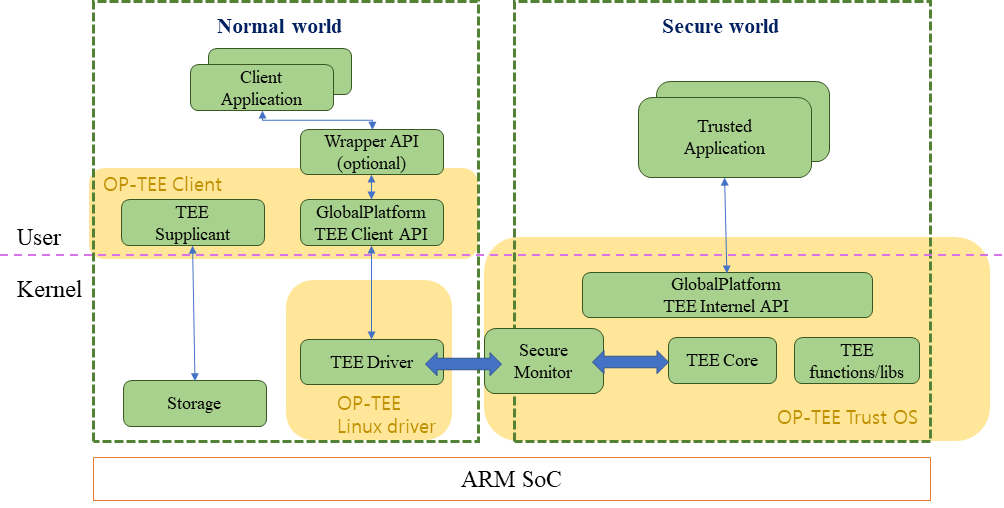
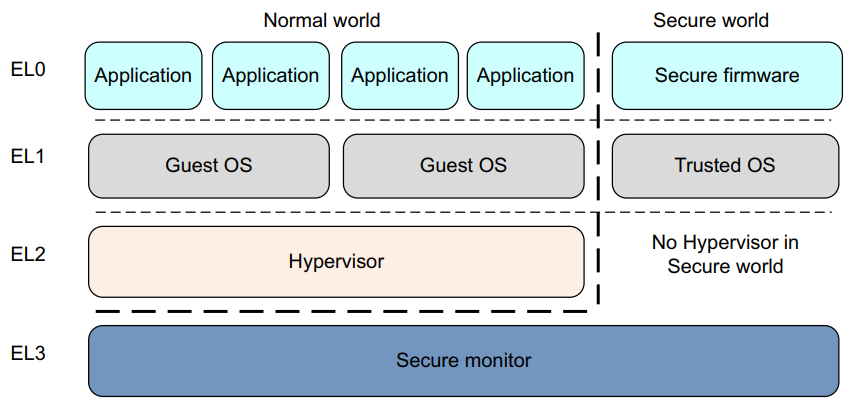
2.2 基于qemu运行optee 我们基于optee来启动ATF,构建optee项目的过程会同时拉取linux kernel和ATF并把这个安全架构的软件栈运行起来
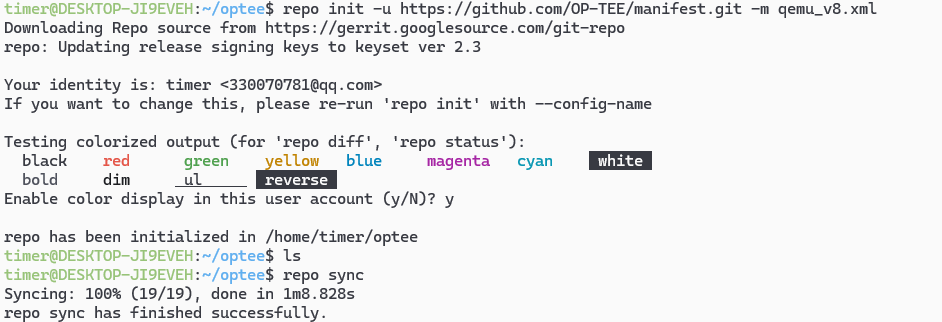
2.2.1 安装repo 在Ubuntu 20.04上,直接通过apt命令安装repo可能会遇到问题。推荐使用以下步骤来安装repo:
下载repo :
curl https://mirrors.tuna.tsinghua.edu.cn/git/git-repo -o repo
添加执行权限 :
移动repo :
2.2.2 下载编译OP-TEE源码 optee的github仓库如下:https://github.com/orgs/OP-TEE/repositories
optee官方文档如下:https://optee.readthedocs.io/en/latest/building/devices/qemu.html#qemu-v8
$ mkdir optee$ cd optee$ repo init -u https://github.com/OP-TEE/manifest.git -m qemu_v8.xml $ repo sync $ cd build$ make toolchains $ make run
步骤如下:
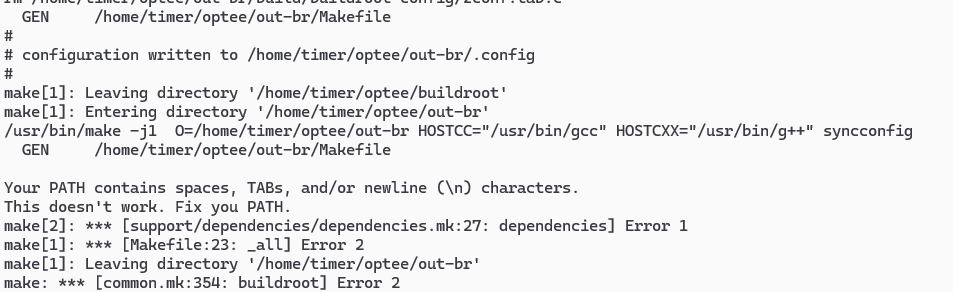
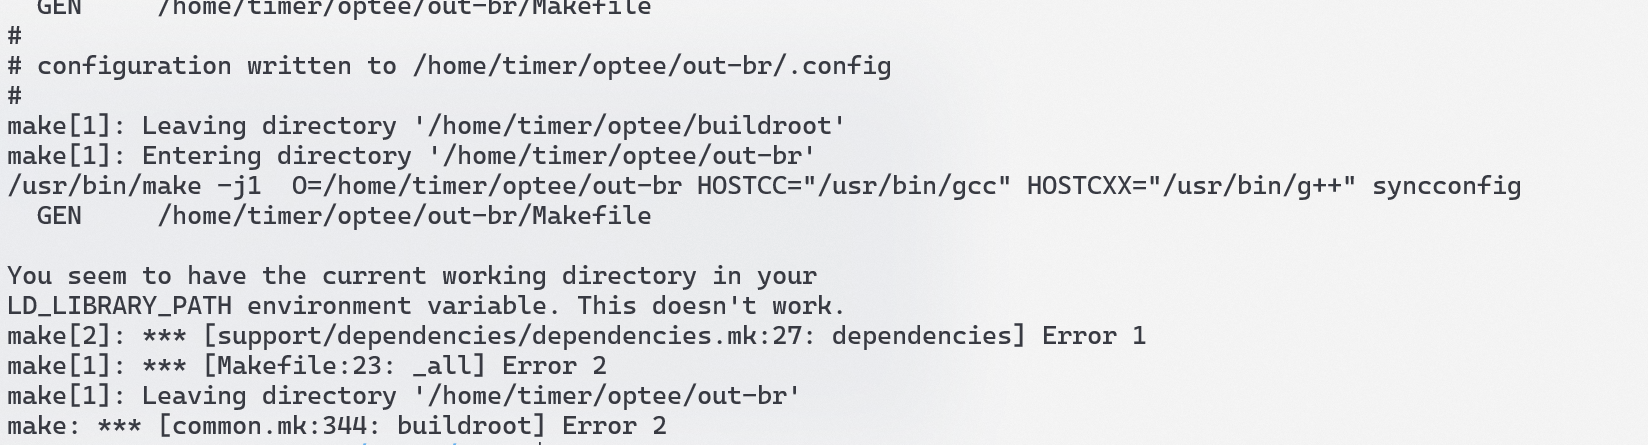
下面这个错误:
是因为使用WSL编译的原因,WSL的PATH引入了windows的路径导致的
解决办法:PATH=/usr/local/sbin:/usr/local/bin:/usr/sbin:/usr/bin:/sbin:/bin make run
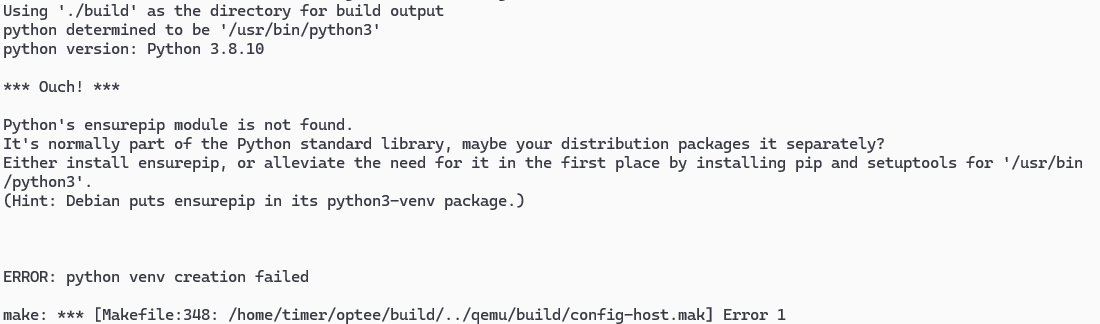
sudo apt-get install python3-venv
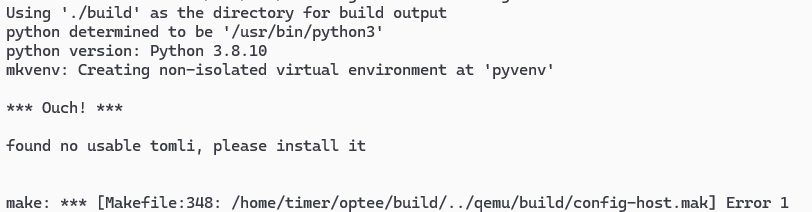
从官网下载源码(GLib 下载页 ),选择 2.66.0 及以上版本(如 2.78.0):
wget https://download.gnome.org/sources/glib/2.78/glib-2.78.0.tar.xz tar -xf glib-2.78.0.tar.xz cd glib-2.78.0meson setup build --prefix=/usr ninja -C build sudo ninja -C build install pkg-config --modversion glib-2.0
2.2.3 wsl启动图形界面 由于我的环境使用的是wsl所以需要配置一下xrdp: https://blog.csdn.net/lpwmm/article/details/106861134
由于WSL2里面不能用systemd,所以需要手动启动
$ sudo /etc/init.d/xrdp start
2.2.4 测试optee https://xdo0.github.io/2022/10/05/op-tee-build.html
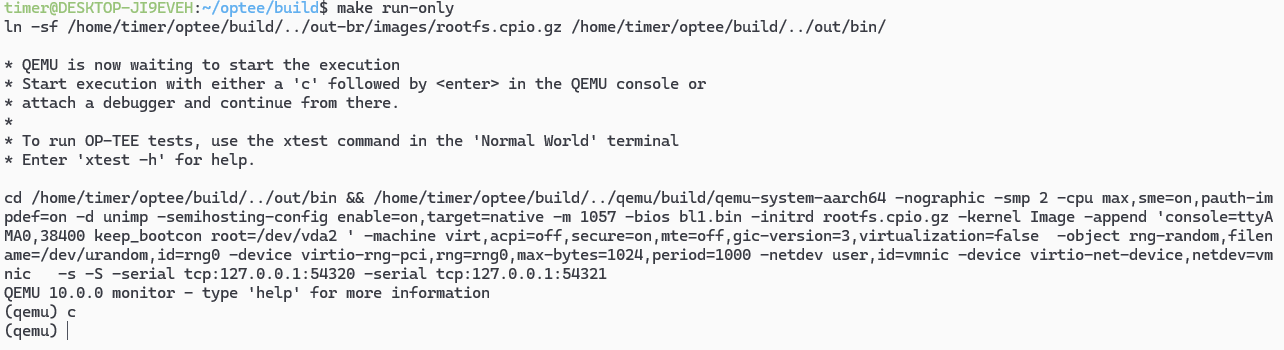
make run-only会开启如下的一个qemu界面,启动的时候可能有点慢,请耐心等待一会儿
然后输入c:
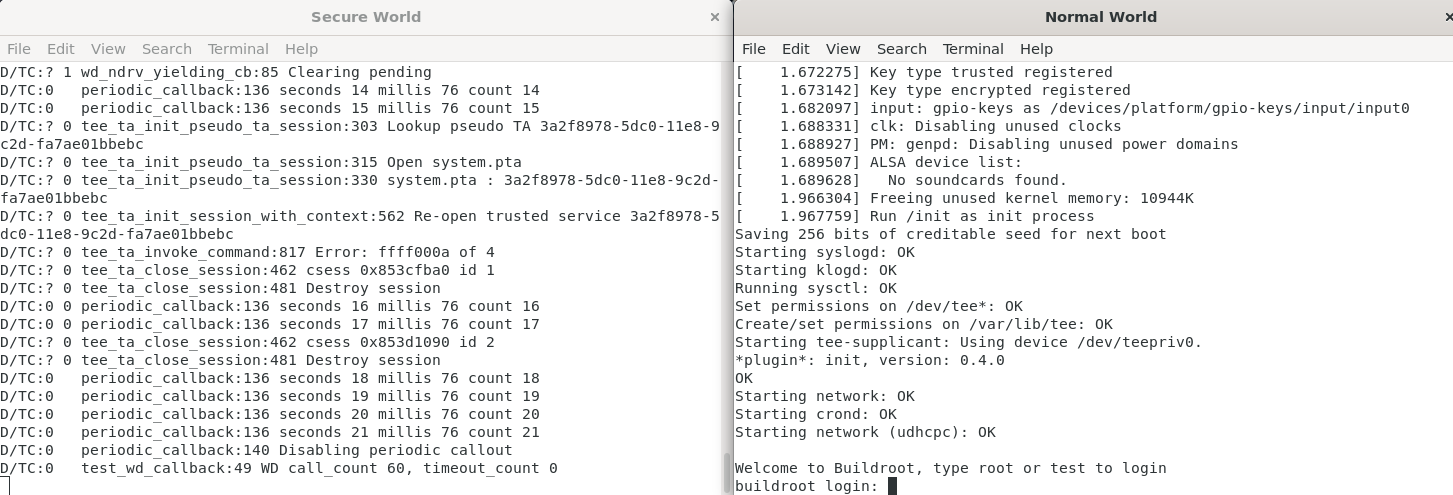
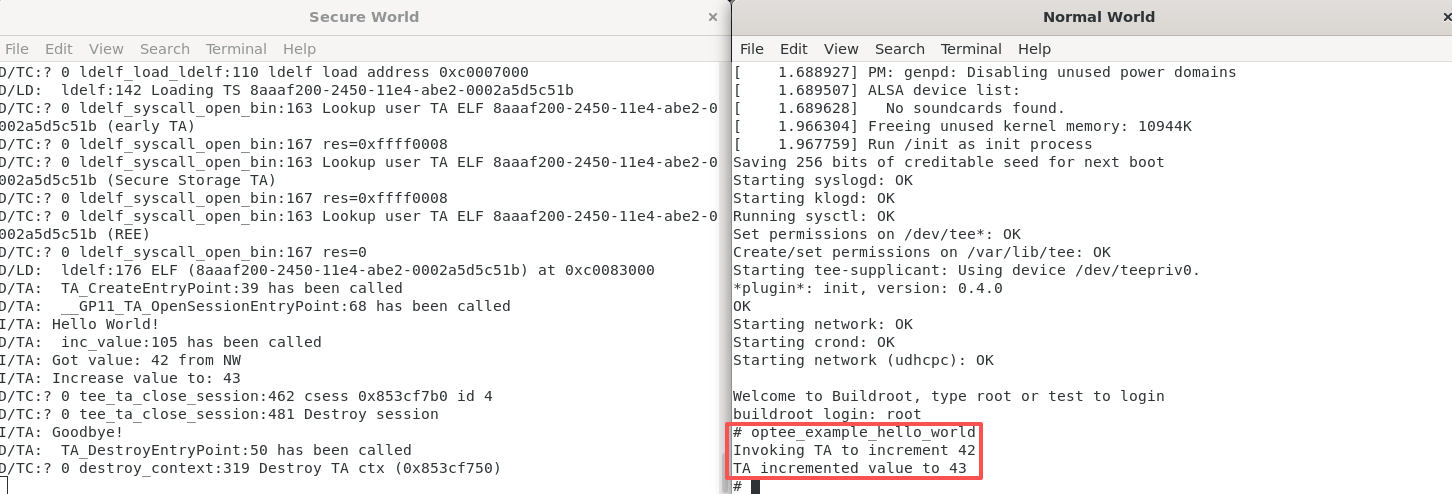
此时会有两个终端启动,分别为Secure World和Normal World,在Normal world中输入root登录,登录后就可以执行Normal world中的CA了,例如:
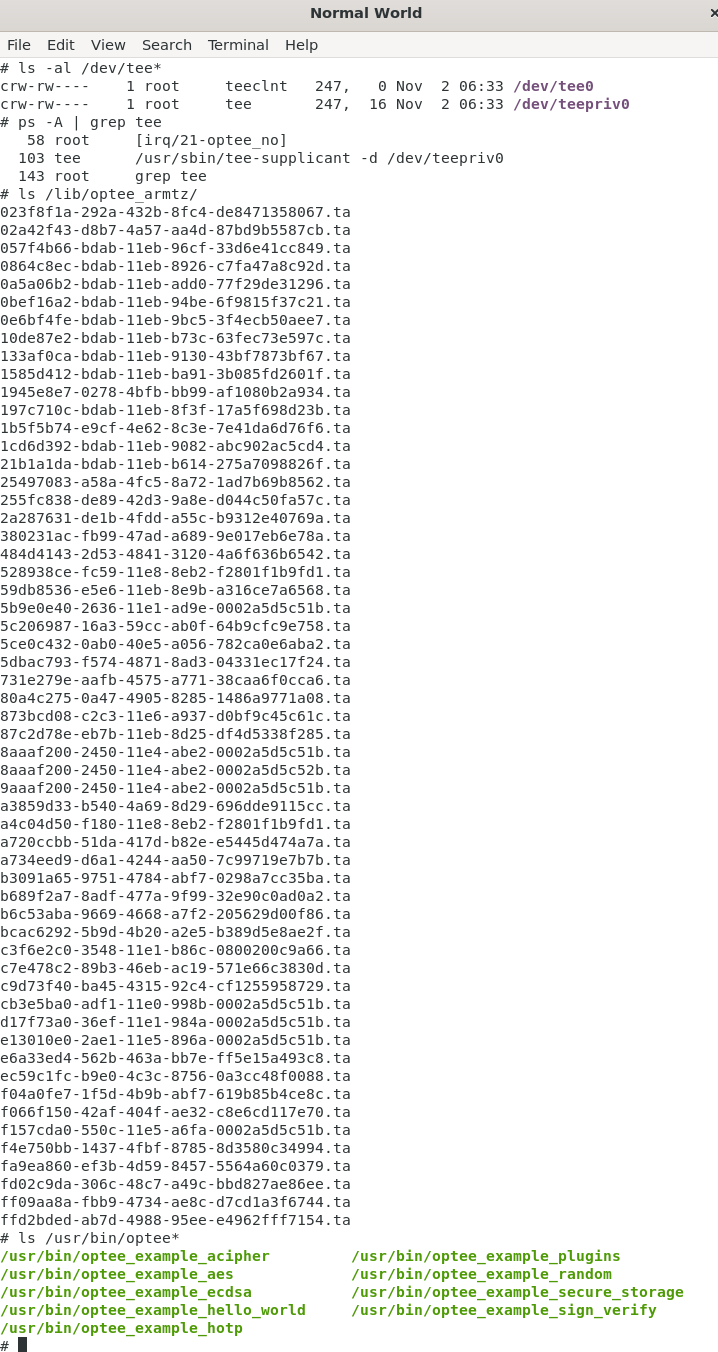
可以在/dev下看见optee的设备节点:
crw-rw---- 1 root teeclnt 247, 0 Nov 2 06:33 /dev/tee0 crw-rw---- 1 root tee 247, 16 Nov 2 06:33 /dev/teepriv0
OP-TEE Client (tee-supllicant)以进程的形式运行在后台,而且随着linux启动。
58 root [irq/21-optee_no] 103 tee /usr/sbin/tee-supplicant -d /dev/teepriv0 143 root grep tee
安全应用会产生ta文件在文件系统/lib/optee_armtz
023f8f1a-292a-432b-8fc4-de8471358067.ta 02a42f43-d8b7-4a57-aa4d-87bd9b5587cb.ta 057f4b66-bdab-11eb-96cf-33d6e41cc849.ta 0864c8ec-bdab-11eb-8926-c7fa47a8c92d.ta 0a5a06b2-bdab-11eb-add0-77f29de31296.ta 0bef16a2-bdab-11eb-94be-6f9815f37c21.ta 0e6bf4fe-bdab-11eb-9bc5-3f4ecb50aee7.ta 10de87e2-bdab-11eb-b73c-63fec73e597c.ta 133af0ca-bdab-11eb-9130-43bf7873bf67.ta 1585d412-bdab-11eb-ba91-3b085fd2601f.ta 1945e8e7-0278-4bfb-bb99-af1080b2a934.ta 197c710c-bdab-11eb-8f3f-17a5f698d23b.ta 1b5f5b74-e9cf-4e62-8c3e-7e41da6d76f6.ta 1cd6d392-bdab-11eb-9082-abc902ac5cd4.ta 21b1a1da-bdab-11eb-b614-275a7098826f.ta 25497083-a58a-4fc5-8a72-1ad7b69b8562.ta 255fc838-de89-42d3-9a8e-d044c50fa57c.ta 2a287631-de1b-4fdd-a55c-b9312e40769a.ta 380231ac-fb99-47ad-a689-9e017eb6e78a.ta 484d4143-2d53-4841-3120-4a6f636b6542.ta 528938ce-fc59-11e8-8eb2-f2801f1b9fd1.ta 59db8536-e5e6-11eb-8e9b-a316ce7a6568.ta 5b9e0e40-2636-11e1-ad9e-0002a5d5c51b.ta 5c206987-16a3-59cc-ab0f-64b9cfc9e758.ta 5ce0c432-0ab0-40e5-a056-782ca0e6aba2.ta 5dbac793-f574-4871-8ad3-04331ec17f24.ta 731e279e-aafb-4575-a771-38caa6f0cca6.ta 80a4c275-0a47-4905-8285-1486a9771a08.ta 873bcd08-c2c3-11e6-a937-d0bf9c45c61c.ta 87c2d78e-eb7b-11eb-8d25-df4d5338f285.ta 8aaaf200-2450-11e4-abe2-0002a5d5c51b.ta 8aaaf200-2450-11e4-abe2-0002a5d5c52b.ta 9aaaf200-2450-11e4-abe2-0002a5d5c51b.ta a3859d33-b540-4a69-8d29-696dde9115cc.ta a4c04d50-f180-11e8-8eb2-f2801f1b9fd1.ta a720ccbb-51da-417d-b82e-e5445d474a7a.ta a734eed9-d6a1-4244-aa50-7c99719e7b7b.ta b3091a65-9751-4784-abf7-0298a7cc35ba.ta b689f2a7-8adf-477a-9f99-32e90c0ad0a2.ta b6c53aba-9669-4668-a7f2-205629d00f86.ta bcac6292-5b9d-4b20-a2e5-b389d5e8ae2f.ta c3f6e2c0-3548-11e1-b86c-0800200c9a66.ta c7e478c2-89b3-46eb-ac19-571e66c3830d.ta c9d73f40-ba45-4315-92c4-cf1255958729.ta cb3e5ba0-adf1-11e0-998b-0002a5d5c51b.ta d17f73a0-36ef-11e1-984a-0002a5d5c51b.ta e13010e0-2ae1-11e5-896a-0002a5d5c51b.ta e6a33ed4-562b-463a-bb7e-ff5e15a493c8.ta ec59c1fc-b9e0-4c3c-8756-0a3cc48f0088.ta f04a0fe7-1f5d-4b9b-abf7-619b85b4ce8c.ta f066f150-42af-404f-ae32-c8e6cd117e70.ta f157cda0-550c-11e5-a6fa-0002a5d5c51b.ta f4e750bb-1437-4fbf-8785-8d3580c34994.ta fa9ea860-ef3b-4d59-8457-5564a60c0379.ta fd02c9da-306c-48c7-a49c-bbd827ae86ee.ta ff09aa8a-fbb9-4734-ae8c-d7cd1a3f6744.ta ffd2bded-ab7d-4988-95ee-e4962fff7154.ta
有一些example实例:”/usr/bin”
/usr/bin/optee_example_acipher /usr/bin/optee_example_plugins /usr/bin/optee_example_aes /usr/bin/optee_example_random /usr/bin/optee_example_ecdsa /usr/bin/optee_example_secure_storage /usr/bin/optee_example_hello_world /usr/bin/optee_example_sign_verify /usr/bin/optee_example_hotp
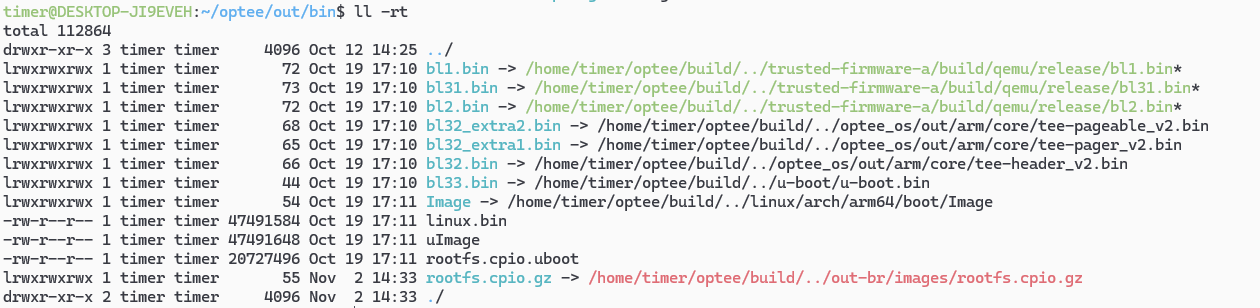
2.2.5 基于QEMU的OPTEE启动过程 OPTEE的整个工程编译出来的结果在out/bin目录:
我们可以看到各个二进制文件都是谁生成的:
linux & rootfs:uImage 、Image 、linux.bin、rootfs
ATF:bl1.bin、bl2.bin、bl31.bin
OPTEE:
bl32_extra1.bin(tee-pager_v2.bin)
bl32_extra2.bin(tee-pageable_v2.bin)
bl32.bin(tee-header_v2.bin)
bl33.bin(u-boot.bin)
qemu启动的脚本如下:
.PHONY : run-only run-only : ln -sf $(ROOT )/out-br/images/rootfs.cpio .gz $(BINARIES_PATH )/ $(call check-terminal) $(call run-help) $(call launch-terminal,$(QEMU_NW_PORT ),"Normal World" ) $(call launch-terminal,$(QEMU_SW_PORT ),"Secure World" ) $(call wait-for -ports,$(QEMU_NW_PORT ),$(QEMU_SW_PORT )) cd $(BINARIES_PATH ) && $(QEMU_BIN ) $(QEMU_RUN_ARGS )
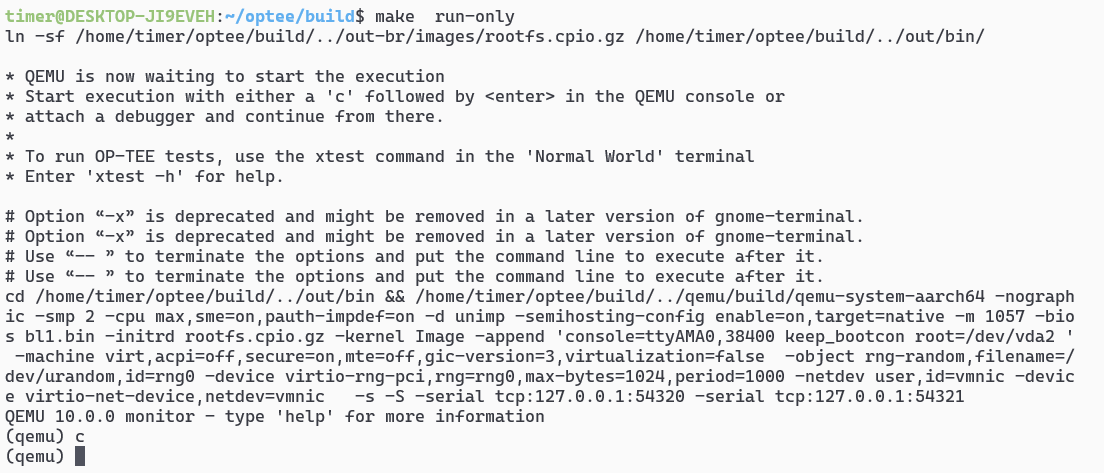
根据log可见,和上面的启动命令是一一对应的
timer@DESKTOP-JI9EVEH:~/optee/build$ make run-only ln -sf /home/timer/optee/build/../out-br/images/rootfs.cpio.gz /home/timer/optee/build/../out/bin/* QEMU is now waiting to start the execution * Start execution with either a 'c' followed by <enter> in the QEMU console or * attach a debugger and continue from there. * * To run OP-TEE tests, use the xtest command in the 'Normal World' terminal * Enter 'xtest -h' for help . cd /home/timer/optee/build/../out/bin && /home/timer/optee/build/../qemu/build/qemu-system-aarch64 -nographic -smp 2 -cpu max,sme=on,pauth-impdef=on -d unimp -semihosting-config enable =on,target=native -m 1057 -bios bl1.bin -initrd rootfs.cpio.gz -kernel Image -append 'console=ttyAMA0,38400 keep_bootcon root=/dev/vda2 ' -machine virt,acpi=off,secure=on,mte=off,gic-version=3,virtualization=false -object rng-random,filename=/dev/urandom,id =rng0 -device virtio-rng-pci,rng=rng0,max-bytes=1024,period=1000 -netdev user,id =vmnic -device virtio-net-device,netdev=vmnic -s -S -serial tcp:127.0.0.1:54320 -serial tcp:127.0.0.1:54321QEMU 10.0.0 monitor - type 'help' for more information
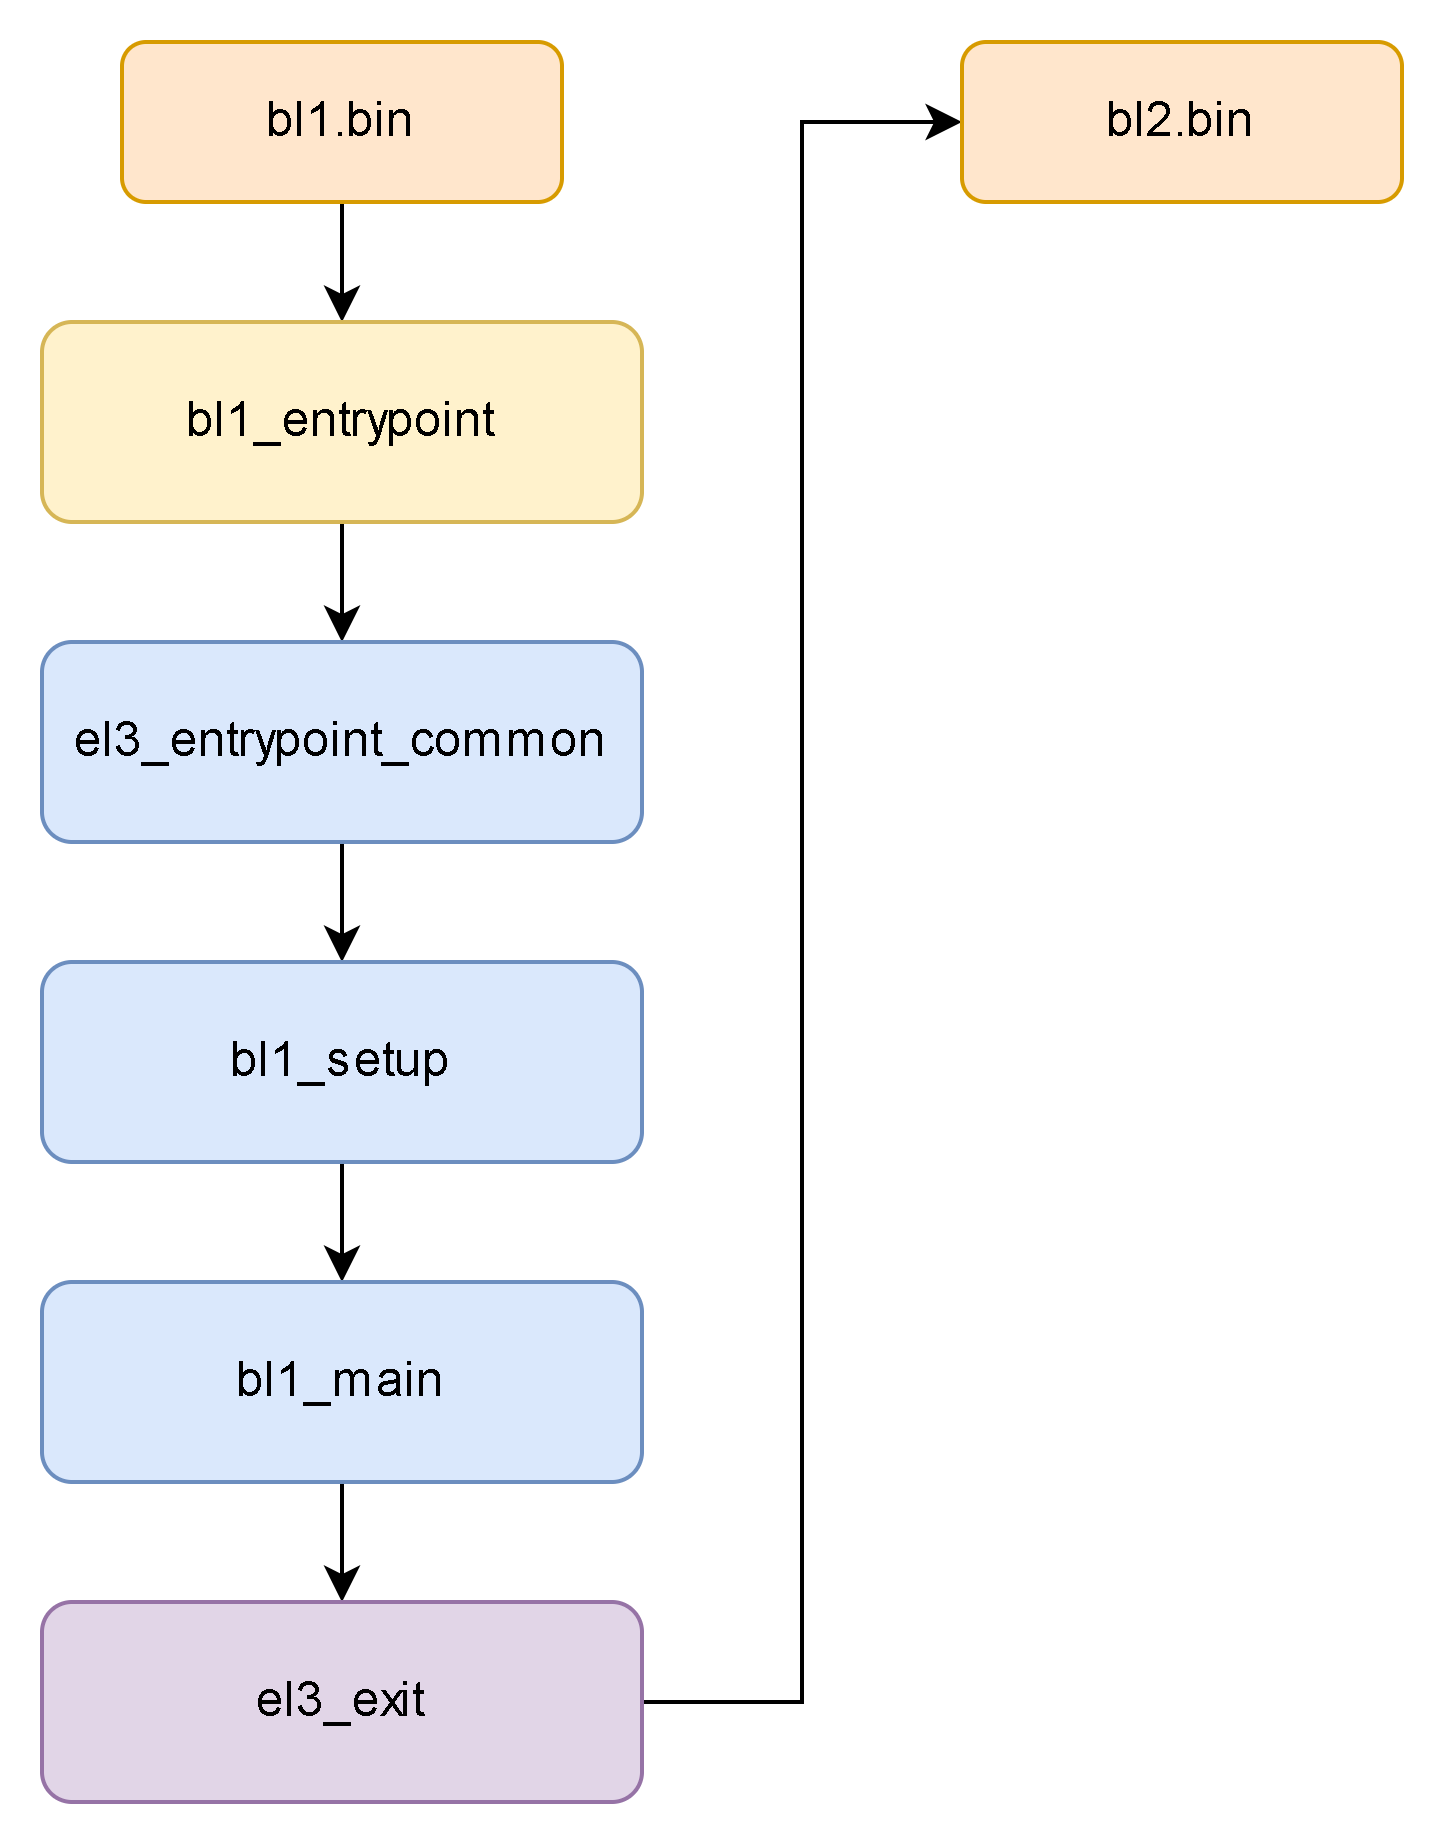
其中第一阶段:-bios bl1.bin,启动的过程可以在Normal World的log中看见


 微信
微信 支付宝
支付宝
![Xhyper剖析[6]--中断虚拟化](/2026/01/20/Xhyper%E5%89%96%E6%9E%90-6-%E4%B8%AD%E6%96%AD%E8%99%9A%E6%8B%9F%E5%8C%96/17689244713913.png)
![Xhyper剖析[5]--MMIO虚拟化](/2026/01/20/Xhyper%E5%89%96%E6%9E%90-5-MMIO%E8%99%9A%E6%8B%9F%E5%8C%96/17689243819381.png)